Toilets are the workhorses of your bathroom. They are built to last, yet almost every homeowner will eventually deal with one. Clogs are the most common complaint, but they aren’t the only issue. You might hear strange noises from the tank or notice water running continuously. The good news is that most of these problems don’t require a professional. You can handle them yourself.
Learning these quick fixes saves money and keeps the plumber away. We are going to walk through the basics of toilet repair. It starts with the simplest task.
Зміст
Replacing a Toilet Seat
Replacing the lid and seat is the easiest repair you can do. Modern toilets come in two standard sizes. Replacement seats are made to fit these specific dimensions. You should be able to find a style that matches your bathroom’s color scheme without much effort.
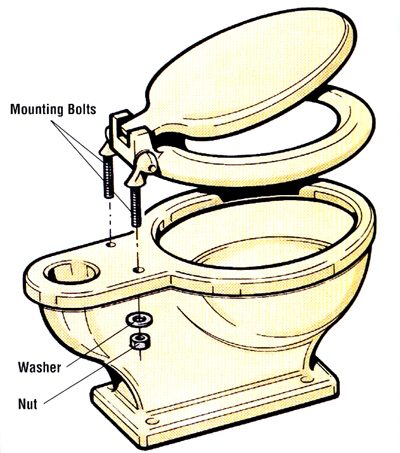
Once you have the new seat, it is time to remove the old one. You need to remove the two nuts on the hinge. Lift the old seat up and out.
This part can be tricky.
The nuts securing the seat often rust or corrode. They become stuck over time. Some toilets have recessed nuts. These are practically inaccessible. You might struggle to reach them with a standard wrench. Patience is key here.
Removing a rusty toilet seat nut requires steady hands and the right tools.
If the nuts are stuck, you may need a penetrating oil. Let it sit for a few minutes. Then try again. Do not force it. You could crack the porcelain.
When you get the old seat off, clean the mounting area. Wipe away any grime or old residue. This ensures a tight fit for the new seat.
Insert the bolts into the holes on the toilet bowl. Place the new seat over them. Slide the nuts onto the bolts. Tighten them by hand first. Then use a wrench to secure them.
Do not overtighten.
Plastic nuts can strip easily. Metal nuts can crack the porcelain if you go too hard. Tighten them just enough to stop wobble.
Test the seat. It should stay in place when you sit on it. It should lift and lower smoothly. If it feels loose, adjust the nuts slightly.
This is a low-risk project. You will save money on labor costs. You will also have a seat that fits your preference. Whether you want a soft-close lid or a specific shape, DIY gives you that choice.
Start with this task. It builds confidence for bigger jobs. Your bathroom will look fresh. The immediate annoyance of a loose seat will disappear.
What’s next? The tank might still be making noise. But that is a problem for another day. For now, enjoy the silence. And the clean look.

Replacing the Seat Without Breaking the Porcelain
Start by sliding the two mounting bolts through the hinge holes. Slip the washers on next. Then, reach underneath and tighten the nuts by hand first.
Stop before they feel rock solid.
Over-tightening is a rookie mistake that makes future replacements a nightmare. You want the seat snug, not fused to the porcelain.
But what if the bolts are already stripped or rusted shut?
If you can reach the hardware easily, spray penetrating oil on the threads. Let it sit. Don’t rush it. An hour or two gives the solvent time to chew through the corrosion. Grab a wrench. If the space is tight, use a deep socket wrench.
Apply steady pressure. No jerking.
If the tool slips, it could crack the tank. That’s expensive. That’s a new toilet.
“Be extremely cautious in using the saw—a careless slip with a hacksaw can crack the fixture just as easily as a blow with a wrench.”
When brute force fails, you cut them out.
Use a hacksaw. Put tape on the porcelain where the blade will rub. Protect the finish. Slide the blade under the hinge. Saw through the bolts.
Again. Carefully.
One slip and you’re looking at a replacement bowl.
With the hardware removed, the old seat lifts off. Clean the area thoroughly. New hardware goes in the same way—bolts, washers, nuts. Tighten just enough.
If you’re renting, keep the old seat. It’s cheap insurance for when you move out. Put the original back in place so you don’t lose your security deposit.
Fixing Worn Bumpers
Lid and seat look fine? Check the feet.
Those small rubber bumpers on the bottom wear down over time. They squeak. They slide. They look ugly.
Buy replacements.
Hardware stores sell them. Some screw in. Some need glue. Some need nails. Pick the type that fits your existing holes.
Try to place the new bumpers close to the old holes. It hides the wear. Makes it look like you never touched it.
Diagnosing Constant Running or Weak Flushes
The tank is running. That’s a waste of water. And money.
Check the float ball. Is it misaligned? Bend the rod slightly. Make sure the ball isn’t rubbing the side of the tank.
Does the ball contain water? It shouldn’t. If it’s heavy with water, empty it or replace it.
If the float isn’t rising high enough, bend the rod down. Carefully. Just a little.
The tank ball at the bottom might not be sealing. Corrosion on the valve seat lip stops the water from stopping. Clean it off. Replace the tank ball if it’s worn. Adjust the lift wire and guide.
If the ballcock valve still won’t shut off, replace the washers. Or replace the whole assembly. It’s often cheaper than fiddling with old parts.
Toilet doesn’t flush well?
Clog in the drain. Remove it.
Not enough water in the tank? Raise the float rod up slightly.
Tank ball falls back too early? Move the guide up. Let the ball rise higher.
Fixing Leaks and Whining Noises
Water pooling around the base?
Leak at the flange wax seal. You have to remove the toilet. Install a new wax ring.
Leak where the tank joins the bowl? Tighten the spud pipe nuts. Replace the spud washers if they’re shot.
Leak at the water inlet? Tighten the locknut and coupling nut. Replace washers and gaskets.
Crack in the bowl or tank? Replace the fixture. No patch will hold for long.
Tank whines while filling?
Ballcock valve acting up. Replace washers. Or the whole assembly.
Restricted water supply? Check the shutoff. Make sure it’s fully open. Look for scale or corrosion at the entry point into the tank.
Moisture around the fixture?
Condensation. Install a foam liner. A tank cover. A drip catcher. Or a temperature valve.
Clearing a Stubborn Clog
Plunger. The plumber’s friend.
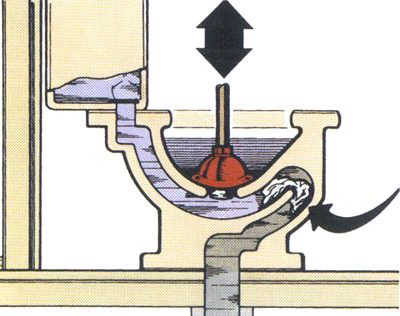
Make sure there’s enough water in the bowl to cover the rubber cup. If not, add water from a pot. Don’t flush. Flushing a clogged toilet just makes it overflow.
Use the bulb-type plunger. It’s better for toilets. Some have a fold-out head designed specifically for this job.
Work the handle up and down. Vigorously.
If that doesn’t work, the clog is right there. Hook it. Pull it.
A wire coat hanger can work. Straighten it. Bend a small hook at the end. Fish around.
But it’s a substitute. Get a closet auger for real results.
“A wire coat hanger can sometimes do the job, but it is really a substitute for the closet or toilet auger.”

Getting Serious About the Clog
You cannot plunge blindly. First, check the water level in the bowl. The rubber cup needs to be fully submerged to create proper suction. If the water is too low, add some. Then pump. Hard. You are trying to dislodge what is stuck.
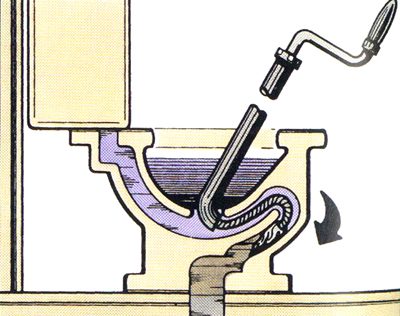
When the plunger fails, you reach for the auger. This tool is designed for toilets. It has a long sleeve that guides the metal snake and hook deep into the trap. A crank handle at the end lets you twist the mechanism. Here is the process.
Using a Closet Auger
- Insert the auger head into the drain. Turn the crank. Stop when the resistance becomes tight. The snake has likely reached the blockage and twisted into it.
- Pull back on the auger. You should be able to extract the clog along with the hook.
- If the first attempt fails, try again. Work the crank. Pull. Repeat.
Sometimes the blockage is stubborn. You might need to push a standard plumber’s snake through the debris. It requires more force.
Removing the Toilet
If nothing works, the toilet comes off. You have to unbolting it from the floor and tip it upside down. This gives you direct access to the blockage.
It is not a simple task. Most people want to avoid it. Try every simpler method first.
But it is not impossible. An average DIYer can do this. The steps are detailed in the next section.
You will need a bucket. And some wax rings. And patience.
The key is to avoid the nuclear option until the basic tools fail.
Do you have the right tools for the job? Or are you just guessing?
The water keeps rising. The clog remains. You have to decide: keep trying or take the plunge. Literally.
One way or another, the toilet comes out. Or the clog goes away. Usually the former.
The Closet Auger Mechanism
The closet auger is not just a snake. It has a long sleeve designed to guide the auger hook straight into the toilet trap. You don’t have to guess where the blockage is. The sleeve keeps the mechanism aligned. A crank on the handle lets you turn the hook manually. This twisting motion is what actually dislodges the clog. It’s mechanical. It’s direct. You control the torque.
Fixing the Running Toilet
A clogged bowl grabs your attention. The water doesn’t go down. That’s urgent. Tank issues are different. They creep in. A strange noise. A constant hiss. You might ignore it until the water bill spikes.
It’s not just annoying. It’s expensive.
Most tank problems are easy to fix. You don’t need a plumber. You can do it yourself. The parts are cheap. The process is straightforward. Stop the waste. Fix the flow.
Start with the flapper. That rubber valve at the bottom often fails. It gets warped. It gets mineral buildup. Water leaks from the tank into the bowl. The fill valve thinks the tank is empty. It refills. And refills. And refills.
Check the chain length. If it’s too tight, the flapper won’t seal. If it’s too loose, the lift bar can’t pull it up properly. Adjust it. Snap it into place.
Look at the fill valve. Is the water level set correctly? It should be about an inch below the overflow tube. Turn the screw on top or slide the clip down. Lower the level. You’ll save gallons every cycle.
Listen for the sound. A humming fill valve is a dying fill valve. It’s struggling against pressure. Replace it. They cost less than ten dollars. You can buy a universal kit that fits most tanks.
Shut off the supply valve. Flush the toilet. Empty the tank. Drain the residual water with a sponge. Take out the old parts. Install the new ones. Reconnect the supply line. Turn the water back on.
Watch it fill. Listen for the shut-off. If it stops before the float reaches the set height, adjust the float arm. If it runs into the overflow tube, raise the float or tighten the screw.
No more hissing. No more waste. Just a quiet tank.
Why This Matters
Water waste adds up. Fast. A running toilet can use hundreds of gallons a day. That’s not just money lost. It’s strain on the system. Fixing it is immediate. The payoff is visible in the next bill.
Tools you’ll need:
– Adjustable wrench
– Sponge
– New flapper or fill valve kit
– Screwdriver
Safety isn’t a huge issue here. But be careful with the porcelain. It cracks easily. Don’t overtighten the bolts. One slip and you’re replacing the whole toilet.
Check the seal. Make sure nothing is rubbing against the moving parts. A simple visual check goes a long way.
Is it worth the five minutes? Yes.
The tank holds the power. When it works right, it’s invisible. When it fails, it’s loud. Fix the leak. Stop the flow.
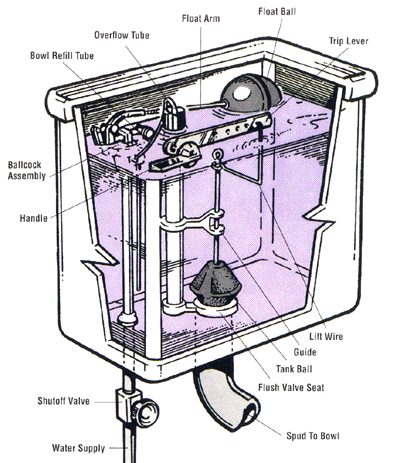

Toilet tank troubles are more than just an annoyance. They waste water. And water costs money. Most of these issues are simple to fix once you understand the mechanics.
A cross-section of a typical tank reveals a surprisingly elegant system. But when it breaks, water leaks and bills climb. Knowing how the parts interact helps you diagnose the source quickly.
Lift the lid. Look at the components. Follow the chain of events that happens when you flush.
The Mechanics of a Flush
Flushing starts with a simple motion. You pull the handle. Inside, a trip lever rises. This lever pulls wires upward. The wires lift a rubber flap or tank ball at the bottom.
With the flush valve opening clear, water rushes out. It floods into the bowl. This raises the water level in the bowl above the trap level.
As the tank empties, a float ball drops. It is floating on the remaining water. The drop pulls down on the float arm. This action raises a plunger in the ballcock assembly.
Fresh water enters the tank. Gravity does the rest. The new water pushes the bowl water out. Siphoning begins. It cleans the bowl.
The siphon stops when the bowl empties. Air enters the trap. Meanwhile, the rubber flap falls back. It seals the flush valve.
When the Shut-Off Fails
The rising water lifts the float ball again. Eventually, the arm is high enough. The plunger lowers. The incoming water stops.
If the shut-off fails, an overflow tube saves the day. It carries excess water into the bowl. This prevents the tank from flooding the bathroom floor.
But continuous flow still wastes water. If you hear a constant hiss or see water running into the bowl, the float isn’t working.
How to Fix a Float That Won’t Rise
Start with the easiest check. Lift the float arm manually. Watch the water.
If the flow stops, the diagnosis is clear. The float ball isn’t rising far enough. It isn’t triggering the shutoff.
One common cause is friction. The float ball may be rubbing against the tank side. This blocks its upward travel.
Bend the float arm. A slight adjustment moves the ball away from the wall. Give it room to rise freely.
Check the arm again. Lift it. Does the water stop? If yes, the fix worked.
Sometimes the float is filled with water. This makes it heavy. It won’t float. You have to replace the entire unit in that case. But for rubbing issues, a bend is all that’s needed.
Why This Matters
A running toilet can waste hundreds of gallons a day. The cost adds up. The fix is often under a minute.
Inspect your tank. Lift the lid. Watch the float. If it drags, bend the arm. Simple.
There are other reasons for running toilets. A faulty flapper is another culprit. But start with the float. It’s the first line of defense.
Does your float move freely? Or does it stick? That tells you where to look next.
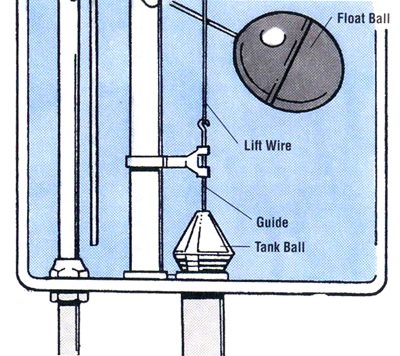

If your toilet runs continuously, the issue often lies in the mechanical linkages inside the tank. Before tearing anything apart, check the guide and lift wire. These components raise and lower the tank ball. Ensure they are aligned properly. Misalignment is a common culprit for leaks that mimic float failures.
Diagnosing Float Ball Issues
Step 2: If the tank ball isn’t touching the water surface properly, proceed with caution. Hold the float arm steady. Remove the tank ball from the end of the arm by turning it counterclockwise. Shake the ball. Listen for sloshing. Water inside the hollow ball adds unnecessary weight. This extra mass can prevent the float from rising to its proper height.
If you hear water, shake it out. Reattach the ball. If the plastic is cracked or corroded, replace it. No water inside? Put it back on. Gently bend the float rod downward. This lowers the level the float must reach to shut off the water flow. Sometimes, a slight adjustment fixes the trickle.
Addressing the Flush Valve Seat
Step 3: If the float adjustment didn’t stop the run, look at the tank ball sitting on the flush valve seat. Chemical residue from cleaning tablets or hard water can create a seal that fails to hold. Or, the rubber ball itself may have decayed over time. Water will seep through the opening into the bowl below.
Turn off the water at the toilet shutoff valve. Flush the toilet to empty the tank. Now you can inspect the components clearly. Examine the tank ball for signs of wear. Install a new ball if you see cracks or warping. If the ball is fine, look at the flush valve opening. Clean away debris from the lip using wet-dry emery cloth, steel wool, or a knife. Remove any buildup that prevents a tight seal.
Checking Alignment and Mechanical Parts
Step 4: If excess water still flows through, check the guide or lift wire again. These parts might be out of line or bent. Make sure the guide is in place. The wire must sit directly above the flush valve opening. Rotate the guide until the tank ball falls straight down into the opening. Gravity should do the work here.
If a lift wire is bent, try to straighten it. Or replace it. Check the trip lever rod. Ensure it isn’t rubbing against anything inside the tank. Verify the lift wire is installed in the correct hole on the rod. Wrong placement causes the ball to fall at an angle. An angled drop leaves a gap. Water escapes.
Fixing a Toilet Ballcock Assembly
If neither the float ball nor the tank ball is at fault, the problem must be in the ballcock assembly.
The ballcock assembly looks more complicated than it really is. When you go to a hardware or plumbing-supply store to buy a new ballcock assembly, you’ll find that both plastic and metal units are available. Plastic costs less and will not corrode. But plastic assemblies are not as sturdy as metal ones. In addition, plastic units usually cannot be repaired because many of them are sealed. Nevertheless, you can purchase a type of unit different from the one you’re replacing as long as the new assembly has a threaded shank the same size as the old one. If possible, bring the old assembly with you when you to buy the replacement. Here’s how to fix an older-style ballcock assembly:
Step 1: Make sure the water shutoff valve for the toilet is in the OFF position.
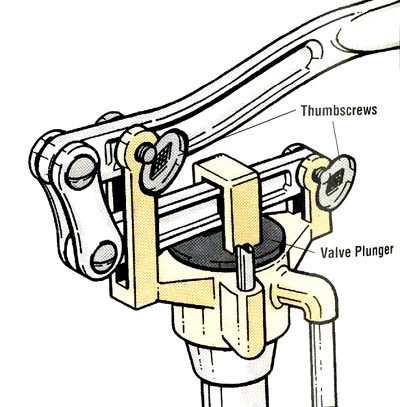

Isolating the Plunger and Seals
Start by checking the assembly. On older ballcock setups, a pair of thumbscrews secures the valve plunger. You need to unscrew them to get the valve out. Once it’s free, look at the bottom. You will find one or two washers and O-rings.
These seals do the heavy lifting. If they are worn, water leaks past the plunger. The result is a toilet that runs constantly. Inspect every washer. Replace any that look cracked or flattened.
When to Replace the Whole Unit
Sometimes fixing the washer isn’t enough. If the ballcock assembly itself is sealed shut, you must replace the entire unit. You can’t just swap parts.
Shut off the water at the shutoff valve first. Flush the tank to drain it. Then disconnect the float arm from the old mechanism. Pull the refill tube off the overflow tube.
Disconnecting the Water Line
Look under the tank now. Find where the water inlet pipe enters the base. You’ll see a coupling nut or slip nut there. Loosen it to free the pipe.
Use an adjustable wrench on the retaining nut or locknut just above the slip nut. Grip the base of the shaft inside the tank with another wrench. This prevents the whole unit from spinning while you work.
Extracting the Old Assembly
Unscrew the locknut under the tank. This releases the ballcock assembly. If the nut is seized, apply penetrating oil. Let it sit. Force will only crack the porcelain.
Lift the old assembly out of the tank. Save the washers from all connections. Keep the ones inside and outside. You might need them for fitment checks.
Installation Prep
New parts usually come with the replacement unit. But don’t toss the old washers yet. Keep them until the new ballcock assembly is fully installed. If something breaks during the new install, you might need the old hardware to make it work.
“Keep the old parts until you’ve installed the new ballcock assembly in case new parts are damaged during installation.”
This isn’t just about saving money. It’s about having a backup plan when the new seal doesn’t seat right. Or when the thread pitch is slightly off. You don’t want to be at the hardware store at midnight because a washer shattered.
The plumbing inside a tank is simple. But it’s easy to mess up if you rush. Take your time with the locknut. Wrenches slip. Porcelain breaks. Water spills.
Once the old unit is out, you’re clear to start the reassembly. The new flange needs to sit flush. The gasket must be positioned correctly. One shift can cause a slow leak that ruins your floor.
Check the new inlet valve for debris. Old pipes shed sediment. It can clog the new mechanism before you even turn the water on. Rinse it if it looks dirty.
Turn the supply valve back on slowly. Listen for hissing. Check every connection. Tighten just enough. Overtightening strips threads. Under-tightening leaves gaps.
The float needs to be set to the right height. Too high, and it overflows. Too low, and you don’t get enough water for the next flush. Adjust the screw or clip. Test it.
Flush a few times. Watch the
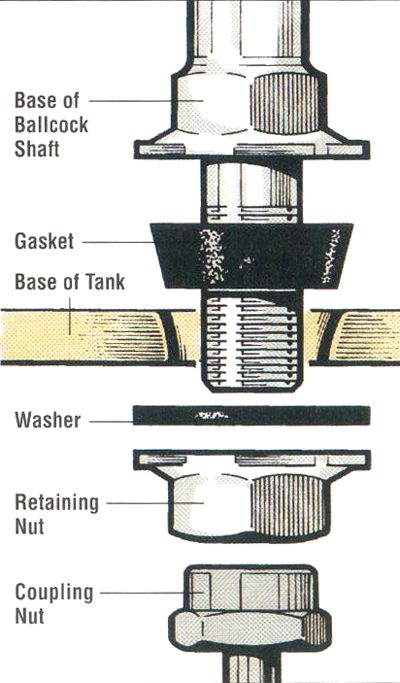

Securing the Assembly
Get the gasket and washer seated right. If they’re crooked, you’re asking for a leak. Tighten the retaining unit firmly. It needs to be solid, not loose.
Slide the new ballcock assembly into the tank hole. The inside washer has to be in place before you start turning anything.
Tightening and Reassembly
Tighten the locknut on the outside. You want it watertight against the hole. Don’t crank it down so hard that you crack the porcelain. Over-tightening is a rookie mistake. Just secure it enough to stop water from seeping out.
Hook up the coupling nut and water inlet pipe. Reattach the float arm. Slide the refill tube into the overflow tube. Keep it simple.
Testing for Leaks
Flip the shutoff valve on. Wait for the tank to fill. Watch for drips. Check every connection point.
Look at the float ball. Does it rub against the back of the tank? If it does, the water level might be wrong. Or the arm is bent. Fix it before you close the lid.
Modern Ballcock Designs
Old-school float arms are disappearing. Newer ballcock assemblies don’t need them.
Some use a plastic cup. It floats up as the tank fills. When it hits a certain height, it cuts the water. You adjust the water level by moving the cup up or down on a pull rod.
Why switch? The water pressure stays full force until the tank is actually full. No slow closing. No groaning noises. Just a quiet fill.
You trade the clunky arm for a silent mechanism. Less moving parts to break. Easier to adjust.
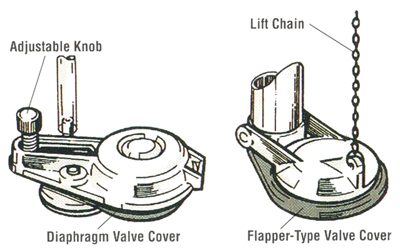

Diaphragm-Valve Ballcock Installation
Most people think of the clanking float arm. It’s iconic. But there is a quieter option. One type of diaphragm-powered valve sits low in the tank. It doesn’t need a float ball. Another uses a flapper cover lifted by a chain.
These newer diaphragm valves rest near the bottom. They sense water levels from down there. No tools required for the unit itself. That makes them easy to install.
Here is how to swap them out.
Steps to Replace the Valve
- Turn off the supply. Shut the shutoff valve. Flush the toilet. Drain the tank. Sponge up the rest.
- Remove the old unit. Follow the standard procedure to take out the old ballcock.
- Prep the new assembly. Slip parts over the inlet pipe under the tank. Order matters.
- Coupling nut
- Friction washer
- Cone washer
- Retaining or mounting nut
- Install inside the tank. Fit the threaded shank through the hole. It goes over the water supply pipe. Ensure the gasket sits in the hole.
- Tighten carefully. Hand-tighten the retaining nut under the tank onto the shank. Do not over-tighten. Push the washers into place. Hand-tighten the coupling nut under the tank.
- Connect the refill tube. Attach one end to the overflow pipe inside the tank. Place the other end on the stem of the new unit.
- Test it. Open the water supply. The tank fills. Adjust the water level with the knob on the new valve.
Solving Common Toilet Problems
Too little water? The bowl stays dirty. Why does this happen?
Check the Water Level
The tank is likely too low. Check the overflow tube. The water should reach within 1 ½ inches of the top. If it’s lower, bend the float arm up slightly. This lets more water in.
Adjust the Flush Valve
Maybe the level is fine. But the flush is weak. The problem could be the tank ball on the flush valve seat. It might drop too soon.
Check the guide. If it’s set too low, the ball lifts early. Raise the guide. Keep it in line with the lift wire. Misalignment causes the ball to drop crooked. Then the toilet runs continuously. You hear the drip. It wastes water.
Clear Clogged Rim Ports
Look under the rim. Small ports carry water into the bowl. They clog with chemical residue. Hard water leaves deposits. This restricts flow.
Use a small mirror to check the holes. Clear the debris. Use a wire coat hanger. An offset Phillips screwdriver works too. Ream out the clog.
Fix Tank Sweating
Toilet tanks sweat. Condensation drips onto the floor. Pipes do it too.
You can buy jackets for the tank. They absorb moisture. Drip pans fit under the tank. They catch the water.
A temperator valve offers a different solution. It mixes hot and cold water. This regulates the temperature. The difference between tank water and room air causes condensation.
Install a temperator valve if your tank water is below 50 degrees Fahrenheit. The temperature gap shrinks. The sweating stops.
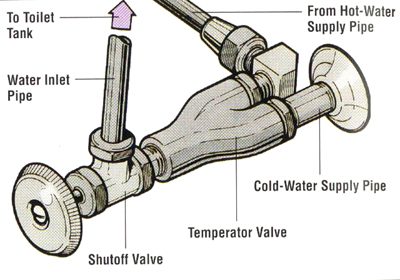

Temperator valves are not a silver bullet. You need a hot-water line hooked directly to the valve, and if that line isn’t nearby, the installation gets messy fast. Worse, these valves don’t stop the water in the tank from cooling down between flushes. That drop in temperature means condensation can still form. You might still see sweat on the exterior or leaks inside.
If you see water pooling, check the connections. Loose fittings or bad washers on the spud pipe are common culprits. So is the junction where the inlet pipe meets the ballcock assembly. Tighten the nuts. Replace any gaskets that look worn. Then, put a few drops of bluing in the tank to spot-check for tiny weeps.
Diagnosing Leaks Under the Bowl
Water seeping from under the base tells a different story. It usually means the wax ring seal has failed. This ring connects the bowl to the drain outlet. If it’s cracked or compressed flat, you have to pull the toilet to fix it.
But there’s a darker possibility. If you see cracks in the porcelain of the tank or the bowl itself, don’t bother trying to glue it back together. Porcelain doesn’t bond well under pressure. The whole unit needs to be replaced.
Replacing a Toilet
Pulling a toilet out is a big job. It’s messy. It smells. But it’s not hard.
Do it when you have to. Unclog attempts failed? Cracks appearing? Leaking at the base? These are signs it’s time to go.
Check your local plumbing codes first. Some towns require a licensed plumber to do the swap. If the law lets you do it yourself, here is how you actually do it.
Measuring for the New Unit
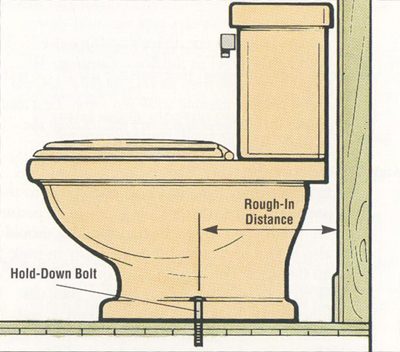
You need the rough-in distance before you buy anything. This is the space between the wall and the center of the floor drain. Measure from the finished wall to the center of the hold-down bolts. If you have two bolts on a side, measure to the rear one.
This number dictates which toilet you can install. You can go smaller. You cannot go larger. If your rough-in is 12 inches, a 10-inch unit fits. A 14-inch unit will stick out into the room. Measure twice. Buy once.
Draining the Old Fixture
Shut off the water supply at the valve. Flush the handle to drain the tank. Use a sponge to soak up the rest. You can’t flush out the bowl with the water off. Use a small container to bail it out. Get the bowl completely dry with a fresh sponge.
Disconnect the tank. If it’s wall-hung, remove the hanger bolts. If it’s a standard one-piece or two-piece, remove the bolts at the bottom that secure the tank to the bowl. Set the heavy tank aside.
Removing the Bowl
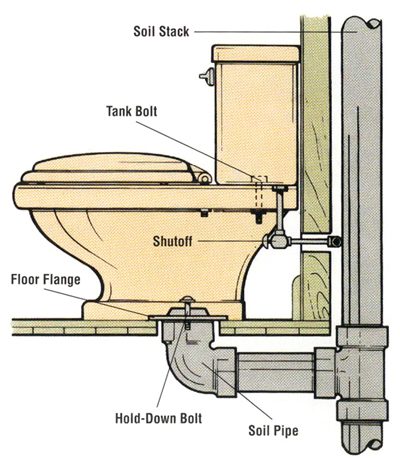
Pop the caps off the hold-down bolts. They’re usually ceramic. Some are glued on with plumber’s compound. Pry them off with a putty knife. Others are threaded. Unscrew them. Brush away the old dried compound.
Now for the nuts. They might be rusted shut. Use penetrating oil. Save the bolts and washers if you think you might reuse them. Once those nuts are off, the bowl is loose.
Crucial step: Plug the drain opening. Tie a cord around an old towel and jam it into the hole. This stops sewer gas from backing up into your bathroom while you work.
Lift the bowl out. It weighs 60 to 70 pounds. Don’t drop it. Crack the porcelain and you’re done. Lay down an old carpet or piece of cardboard. Rock the bowl gently to break the wax seal. Lift it straight up. Set it on your prepared surface.
Preparing the Flange
Inspect the drain pipe. Clear out any debris or old wax. The pipe needs to be clear for the new seal to work.
Scrape away all the old putty and wax residue from the floor flange and the bottom of the new (or old) bowl. Use a putty knife. Get it clean. The new wax ring needs a flat, debris-free surface to compress properly. If you leave bits of old wax or grime, your new installation will leak from day one.


Dealing with Floor Damage and Flange Issues
Before you even think about setting the bowl down, look at the floor where the old toilet sat. If there is rot, you are not just swapping fixtures. You are rebuilding a structural failure. Bad rot means you might need new subfloor or even repair joists. Don’t try to glue your way out of this. Call a carpenter to fix the structure first. If you skip this, the toilet will sink. The floor will crack. You will be doing this again in six months.
Also check the flange. Look at the bolts sticking up. If the plastic is cracked or the threads are stripped, replace them. A broken flange is a leak waiting to happen. Fix it now.
Positioning the Wax Seal
Step 10 involves the wax ring. This is the most common point of failure in any toilet install. If you mess this up, your floor turns into a swamp.
Take your new wax ring. Place it on the bottom outlet of the new bowl. Make sure it is centered.
“If the floor flange is recessed, you’ll need a gasket with a plastic sleeve in the ring. This sleeve should face toward you as you position it, since it will go into the soil pipe.”
Standard wax rings sit on top of the flange. Recessed flanges require that plastic extension. It slides into the pipe to bridge the gap. If you put a standard ring on a recessed flange, you are asking for leaks. Don’t make that mistake.
Setting the Bowl
Step 11. Apply a bead of setting compound around the base. You want a uniform layer. About 2 1/8 inches thick is the target here. This stuff comes in tubes at any hardware store. It seals the gap between ceramic and tile. It also makes removing the toilet later less of a nightmare.
Step 12 is the big move.
Pull the plug from the drain pipe. If you forget this, you will be standing in sewage for an hour.
Flip the bowl upright. Line up the bolts. Lower it gently onto the flange. Don’t just drop it. Set it.
Press down hard. Then give it a slight twist. This seats the wax ring properly. You want to feel it lock in.
Put a level across the bowl. Is it flat? If not, adjust. But be careful. If you twist too hard or lift too high, you break the wax seal. Once that seal breaks, you have to lift the whole thing off and start over. Do not disturb the seal.
Securing and Connecting
Step 13. Tighten the nuts.
Hand-tighten them first. Then use your wrench. A little more. Stop.
Do not over-tighten. Ceramic is brittle. If you crank those nuts down, you will crack the base. The bowl will split. You will have water everywhere. Cracked ceramic is not repairable. You will need a new toilet.
Cover the nuts with caps. Use a bit of that setting compound around the caps to keep them secure and seal the hole.
Step 14. The tank.
If you bought a two-piece toilet, the tank is separate. Bolt it on. If you have a wall-mounted tank, reattach the risers. If it’s a bowl-supported tank, use the bolts and washers. Replace any damaged hardware.
If your toilet uses a spud pipe to connect the tank to the bowl, apply pipe joint compound to the threads. Tighten the slip nuts.
Step 15. Water.
Connect the supply line to the tank. Check the ballcock assembly. Make sure the fill valve is attached.
Turn the water on.
Watch for leaks. Listen for hissing. Watch the seal at the base.
It’s done. Or is it? You have water. You have a bowl. The floor is clean. But the real test is the flush. Wait for it.


