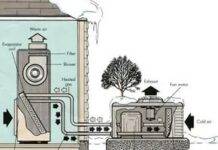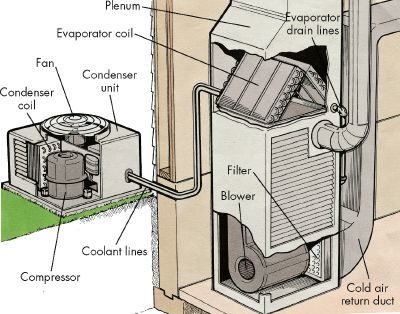
Central air isn’t just one big box. It’s a two-part system working in tandem. You have the condenser outside. You have the evaporator inside. Most homeowners see the noisy unit on the concrete slab and assume that’s the whole story. It’s not. That’s only half the equation.
The condenser unit sits outside your home on a concrete slab. It’s the part that gets hot. It rejects heat into the atmosphere. Inside, things are different. The evaporator coil is mounted in the plenum or main duct junction. It sits right above your furnace. This is where the actual cooling happens. Your cold air gets its start here.
Зміст
The Shared Ductwork Myth
Most central air conditioners hook into your home’s forced-air distribution system. That means you’re using the same infrastructure for heat and cold. The blower motor. The ducts. All of it is shared. When the AC turns on, it doesn’t push air through a separate pipe. It uses the existing network.
Here is where things get tricky for DIYers. The system pulls hot air from your house through the return-air ducts. The blower pushes this air across the cooled evaporator coil. Then it sends the chilled air back out through the supply ducts. If the house isn’t cooling down, don’t immediately blame the AC unit.
When the air conditioner works but the house doesn’t cool, the problem is probably in the distribution system.
Think about it. The evaporator coil might be freezing up. The blower might be weak. Or the ducts themselves could be leaking. If cool air is escaping into the attic or crawlspace before it reaches your living room, the temperature in your house won’t drop. You might have a perfectly functioning condenser outside while the real issue is a disconnected duct joint inside the wall.
Start by checking the filter. A clogged filter restricts airflow. This can cause the evaporator coil to freeze over. Ice blocks the cold air from circulating. You’ll see the ice. You’ll hear the blower straining. But if the filter is clean and the ducts are sealed, the problem likely lies in how the system is delivering air. It’s not always the machine. It’s often the path the air takes.
Next time you hear the hum of the compressor, remember it’s just one half of the job. The other half is hiding in your walls. And if your home feels like a sauna despite the AC running, stop looking at the thermostat. Look at the ducts.
Keep Your Central Air Conditioner Running Efficiently
A central air system is a split setup. You have the condenser unit sitting outside on a concrete pad. Inside, above the furnace, sits the evaporator coil. Both are sealed units.
This means you cannot tinker with the internals yourself. Call a pro for almost anything beyond routine cleaning. Get a professional inspection before the cooling season starts every year. Do not stop there though. Peak efficiency requires more than an annual checkup.
There are specific maintenance steps you can handle. They keep the system running smoothly.
Safety First: Before touching any part of the system, turn off the power. This applies to both the condenser and the evaporator assembly.
Fix Common Central Air Conditioner Problems
You can handle minor issues yourself. If your unit is acting up, check this list first.
Condenser Doesn’t Run
* No power? Check fuses or tripped breakers at the main panel. Restore the circuit.
* Thermostat too high? Lower the setting by 5 degrees.
* Faulty motor or compressor? Call a professional.
Uneven or Inadequate Cooling
* Thermostat setting? Drop it 5 degrees.
* Dirty evaporator? Clean it.
* Unit too small? You will need a larger unit. Hire a pro for replacement.
* Distribution system out of balance? Balance the system.
Unit Turns On and Off Repeatedly
* Condenser dirty? Clean the coil and fins.
* Blockage? Remove debris, cut weeds, or trim vines near the unit.
* Dirty evaporator? Clean it.
A dirty evaporator is a frequent culprit. It restricts airflow. Learn how to clean it below.
How to Clean the Evaporator Coil
The evaporator sits in the plenum above the furnace. Access varies. If the plenum has foil-wrapped insulation at the front, you can clean it. If it is a sealed sheet metal box, do not open it. You will cause damage.
Here is the procedure for an accessible unit:
- Remove insulation. Carefully peel back foil-wrapped insulation. It is likely taped. You will need to reuse this tape later.
- Access the plate. Behind the insulation is an access plate held by screws. Remove them and lift the plate off.
- Clean the coil. Use a stiff brush on the entire underside of the evaporator unit. A hand mirror helps you see deep inside. If you cannot reach the back, slide the evaporator out slightly. Be careful. Rigid pipes may be connected. Do not bend them.
- Clean the drain tray. This tray carries condensation away. Pour one tablespoon of household bleach into the weep hole. This prevents fungus growth.
- Check the drain line. In humid weather, check the pan every other day. If it holds moisture, the weep hole to the drain line is clogged. Clear it with a piece of wire.
- Reassemble. Put the unit back in place. Reinstall the plate. Tape the insulation back over it.
- Test for leaks. Turn the air conditioner back on. Check for air leaks. Seal any gaps with duct tape.
A clean evaporator restores airflow. Your system will work harder to cool if it is clogged. Next, look at the outdoor unit to ensure proper heat exchange.
Clearing Debris and Cleaning the Condenser Coil
The outdoor condenser unit takes a beating. Leaves, grass clippings, dust, and pollen accumulate on the fins and fan. If that coil gets clogged, your air conditioner stops moving heat. You lose efficiency. You pay more.
Before you touch anything, find out which way the air moves. The fan pulls air across the coil. You need to clean that intake side. Cut power at the breaker. Check the airflow direction. Then start.
Step 1: Clear the Perimeter
Start with the vegetation. Grass, weeds, and vines grow fast. They choke the unit. Air needs to flow in and out. Trim back any greenery touching the grille. Give yourself room to work. A weed whacker works, but be careful not to nick the aluminum fins.
Step 2: Rinse and Treat
Commercial coil cleaner is your friend. Buy it at a hardware store or refrigerator supply shop. Read the label. Spray it on the coil. Let it sit for the recommended time.
Here is where most people mess up. Do not blast the coil with a garden hose initially. High pressure forces dirt deeper into the fins. It creates mud. That mud stays there, blocking airflow for years.
Use a soft brush first. Gently scrub away loose debris. If the fins are bent, use a fin comb. These come in plastic or metal. Slide it between the fins. Straighten them gently. Bent fins reduce surface area. Less surface area means poor cooling.
Once the gross stuff is gone, you can rinse. Use low pressure. Rinse from the inside out if possible, pushing dirt away from the house. Let it dry completely before powering back up.
Step 3: Level the Pad
Condensers sit on concrete pads. Over time, the ground settles. The unit tilts. A tilted compressor kills itself faster. Water doesn’t drain.
Place a carpenter’s level on top of the unit. Check front-to-back and side-to-side. If it’s not level, you have work to do.
Lift the heavy unit slightly. Use a pry bar or a 2×4 as a lever. Slide gravel or rocks underneath the concrete pad. Pack it tight. Check the level again. Repeat until the bubble sits in the center. This simple step extends the life of your compressor significantly.
Winter Protection
When autumn hits, the unit faces new threats. Leaves fall. They clog the intake. Ice forms. It cracks the coil.
Cover it. Use a commercial condenser cover that fits your specific model. It’s the safest bet. If you use heavy plastic sheeting, secure it tightly with sturdy cord. Don’t wrap it so tight that it traps moisture. Trapped moisture invites rust and mold.
Warning: Some manufacturers advise against covering the unit entirely. Check your manual. If the manufacturer says no covers, just clear away leaves and debris regularly.
The Refrigerant Reality Check
You’ve cleaned everything. The fins are straight. The pad is level. The air still isn’t cold.
Now you face the refrigerant. Most older systems use Freon. Newer ones use R-410A or similar blends. The coolant is a closed loop. It doesn’t get “used up” like gas in a car. If it’s low, there is a leak.
You cannot fix a leak yourself. You cannot simply add more refrigerant. Adding Freon to a leaking system is illegal in many places and ineffective. It doesn’t solve the root problem.
If you suspect a refrigerant issue, call a licensed HVAC professional. They have gauges, leak detectors, and the certification to handle these chemicals. Do not attempt to recharge the lines yourself. The pressure is high. The chemicals can cause frostbite. The legal ramifications are steep.
Insulating the Lines
While you’re at it, check the copper lines running from the condenser to the evaporator inside. They are usually wrapped in foam insulation.
If that insulation is torn or missing, cool gas escapes into the walls or attic. You lose energy. The compressor works harder.
Replace damaged insulation with new foam tubing of the same diameter. Cut it to length. Slip it over the pipes. Seal the seams with tape. It’s a cheap fix that improves efficiency immediately.
When to DIY and When to Call Pros
You’ve got the basics. Cleaning coils. Leveling pads. Insulating lines. These are hands-on tasks. They save money. They prevent major breakdowns.
But if the air isn’t cold after cleaning, stop. Call the pro. Diagnosis requires tools you don’t have. And refrigerant handling is not a weekend project.
For other home repairs, look into window AC units or thermostat maintenance. Sometimes the problem isn’t the air conditioner at all. It’s the thermostat calibration. Or maybe it’s a different appliance entirely.